Saturday, November 30, 2013

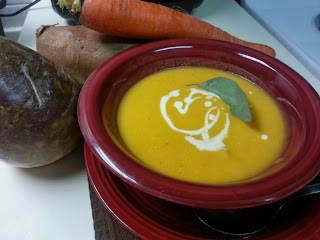
Creamy Carrot & Rutabaga Soup


The colder weather is here, and so it's time to make yummy vegetable soup.

A couple of Sunday's ago, I made Mashed carrots and Rutabaga ( For those in my home country Wales, we call Rutabaga - Swede) with our Sunday Pork Roast Dinner. I'd forgotten how tasty and sweet it was. The rutabaga / Swede is what my mother would give us with our Sunday Chicken Dinner, when I was growing up, although I didn't like it very much! But, oh how my taste buds have changed over the years.

So that got me thinking, that if I liked carrots and Swede/rutabaga mashed, how 'More' yummy I could make it in a soup.

The next trip to the grocery store, I picked up the necessary veggies and dashed home excited to make this soup. I had no recipe to follow, just my taste buds to lead me in the right way.


Here is what I used:

1 Carton of Chicken Broth 
( I normally make my own broth, from chicken bones, but we had Pork the day before)
1 Large Tablespoon of Chicken Bouillon.
1 large Rutabaga
1 small sweet cooking pumpkin
1 small bag organic carrots
3 Yams
2 medium sized onions.
1 stick of butter
1 1/2 Tsp Garam Masala Spice
1 - 6.8 fl.oz carton of  Kara UHT Natural Coconut Cream 
( I got this from Walmart by the Chinese section)
8 cups of Water.
Salt and Pepper to taste.


The first thing I did was to scoop out the inside of the pumpkin, place the 2 halfs of the pumpkins in a shallow oven proof dish with a cup of water, drizzle pumpkins with a little olive oil and sea salt and bake till golden brown and soft.


While the pumpkin is cooking, it's time to get peeling and chopping the veggies into  small chunks.


Now as I was chopping, I had a little helper named, Carys, climb up to give her taste test on all the veggies. Her favorite was the Raw Rutabaga !!! Who'd of thought she'd like that, so I guessed if she liked it raw, she'd surely like the soup.

So after snapping the cute photo shoot. It was back to cooking.


Add your butter to a deep saucepan, with your onions.


Once the butter has melted, add all the veggies and give them a quick stir, coating them in the butter. Next add all the chicken stock. You need to cover all of the veggies, so if your short use some water to top it off.


Bring to a boil, then reduce to a medium heat and simmer, until all the veggies are soft.


Check on the pumpkins, if they're ready to take out and cool.


Once the veggies have been cooking a while and they're nearly soft enough, spoon out the cooked pumpkin into the soup and stir.


Time to taste and then add  1 large spoon of the chicken bouillon, and stir well.


Now using an immersion hand blender, blend the soup till every piece of veggie is blended. You will find the soup will become thick, so you can start to add 1 cup of water.


Now add the coconut cream and blend.


Now I wanted my soup to be thinner, so I added 7 more cups of water.


Next add your Garam Masala spice, salt and pepper and blend. 

Then you have a 
Hearty Creamy Carrot & Rutabaga Soup.
( Or as my darling Lil tinker Seren, calls it Orange Soup)


Then the test is in the tasting right? 

 Right.


Carys certainly tucked into her soup.


Read more >>

Mason Jars - Rustic Industrial Hanging Tea Lights


After I spying, the new Ball Park Vintage Mason Jars, at Target, for $8.99 for 6, I knew I just had to buy them.

The beautiful hue of the blue, is such a pretty color, I knew they would make cute hanging mason jar tea light holders and knew just the right spot to hang my mason jars from.


So can you see the ugly fluorescent lighting on the left and then a gap underneath next to it.
This is the spot wanted to  utilize and make somewhat nicer to look at as well as having softer lighting for, when Jason and I have dinner dates at home (if and when, our Lil tinkers allow, lol)

After a week of trying to figure out 'how' I was going to hang these mason jars to the underside of the cupboards, without wrecking the wood ( again with student housing and not making too many holes) I set to work and hoped it would turn out how I had envisioned it in my head.


 I used 3 vintage blue mason jars and then 2 clear mason jars.
I rummaged around in my dwindling wood pile ( I'm going to have to restock this soon) for wood that would be long enough to fit the width of the underside.


I had some pine wood that would do the trick, so I measured and used a wood saw to make my cuts to make 3 pieces all the same length.


Then using smaller pieces of scrap wood to make my cross pieces. I wasn't worried about the shape of the cross pieces, as you wouldn't be able to see them.


Pre drill your holes.


Screw together using wood screws.


Flip the wood , so you have the right side facing up. Lay out your jars on top.


Mark where you want the jars to go.


Then pre drill  holes.


For the next step, all I did was to stain the wood a walnut  color. 


While I waited for the wood to dry, I made my wire loops from 2mm silver craft wire, which is where I'll hang the chain from.


I cut 6 pieces of wire and bent them in half.


Then I poked the wire through the wood. You can see the wood stain color now.


Once poked through, using pliers, you bend and twist the wire so it sits on the wood.


Push down on the wire twists, then using glue gun, glue in place.


Next I hung the wood base to the underside of the kitchen cupboards. I'd pre marked where the wood ended, then screwed up into the cupboards.


Using some of  my silver 2mm craft wire, I made an 'S' shape then curled the ends.


Next was to take my craft wire and wrap around the jars and make loops to hang the twine from.
Cut a long piece of wire, and in the middle of it make a loop and twist.


Put the loop wire on the side of the jar under the lip, pull the remaining wire around and twist to make your second loop.


Do the same process on all of your jars.


To hide the wire, I used some twine and wrapped it around the wire.


I added a tea light, and some glass pebbles.


Then taking some twine, I strung it through the wire loops.


Now take the s wire loops you made earlier and hang them from the main wood wire loops.
Then taking you mason jars hang them up from the 'S' loops. 

Mason Jar - Hanging tea light holders.


I must say, how much I like how it turned out!! It gives off just enough light for the romantic dinner dates, Jason and I will hopefully start having.
I lit the candles for the pictures, then realized my mistake!


Twine and a flame don't mix well. LOL

So I switched the twine for metal chain. To be safe!


Now it's mixture of rustic and industrial chicness !


How it looks from the underside!!


Read more >>

Popular Posts